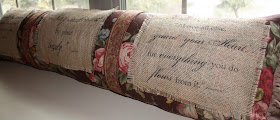
Printing straight from your printer onto burlap????....when I first saw this idea on Pinterest at Domestically Speaking, I thought...no way will that work on my finicky inkjet printer.
Well,... do I have a project for you! Even my wacky printer did the job for me! What I love about Pinterest is that it so inspires me to create!
While my daughter was gone for the weekend at a Church retreat, I thought I'd surprise her with a long pillow for her windowseat or her bed. She has some favorite Bible verses that she had been posting on Facebook before the weekend...so I made word documents using different fonts for each of the 3 verses I was going to use. (Dafont.com is a great resource for free font downloads)
All you need is a roll of Freezer Paper, burlap (I purchased mine at WalMart), iron, and scissors. And your trusty printer, or course.
Cut your burlap and freezer paper close to the size of a standard 8 1/2" X 11" copy paper.
Lay the burlap on the shiny side of the freezer paper. Iron the burlap only, then flip over and iron until fully adhered. (The shiny side has a little wax coating)
Now that the burlap is adhered to the freezer paper, cut it to exact copy paper size.
Place it in your printer so that when it feeds, the printer will copy directly onto the burlap.
Waaalaaa....it worked! I laid them out so that they could dry completely. You could spray them with a matte sealer, for extra protection. (I opted not to) My printer is inkjet and it had no problems feeding or printing...exciting!! Peel off the freezer paper, and you're good to go!
I had made my daughter's bedding a few years back, so I had leftover fabric. I decided to go the easy route, and sew the burlap directly onto the fabric leaving a 5/8" border. Then I fringed the edges. I added some trim, a coordinating fabric on the back, and ruffle on the ends.
Linking up to these parties:
Feathered Nest Friday
I'm along for the ride
Whipperberry-Friday Flair
Remodelaholic


I LOVE THIS!!! {gasp} thank u!
ReplyDeleteso glad you love it!
DeleteBeautiful!
ReplyDeleteI look forward to trying your method!
Blessings,
Betty @ Country Charm
I was surprised how easy it was! Would love to see what you come up with!!
DeleteThis is AMAZING! Cant wait to try it! what a perfect gift as well
ReplyDeleteIt's so fun! and I'm already thinking Christmas presents...etc.
DeleteThanks for following my blog- I am now your newest follower. This is a great project, you should link up to our party. Link once and the post shows up on 4 blogs! It's called "Cowgirl Up!" and it goes live every Tuesday. Hope to see you there!
ReplyDelete:) Samantha @ Crafty Texas Girls
Thanks so much for the invite....will do!! and thanks too for following!
DeleteThis is fantastic, Janis! Great tips on doing this....I've always wanted to know how to use the freezer paper in this manner. Your printouts turned out fabulously!! Thanks for stopping by and commenting on my printables. I'm following you right back!!
ReplyDelete{HUGS},
kristi
Thanks Kristi!! Freezer paper is going to be my new best friend, I'm afraid...:)
DeleteLove this especially with the burlap-I'm your newest follower-stop by for a visit!!
ReplyDeleteYea!! Thanks Claire!! Burlap has such a great texture, and fun to fringe! Appreciate you following!!
DeleteI really need to try this! Craftiness isn't one of my strong suits, but I guess I could sew a pillow. Your end result is certainly a hit!
ReplyDeleteGlad you stopped by via the Linky party. I appreciate your signing up to follow ~ I'll be following along with you, as well, Janis.
:-) Sue
If you can sew a somewhat straight line...you're good to go! Appreciate your comment, Sue!
DeleteGreat pillow. I like the way you created the bolster!
ReplyDeleteThanks so much Honey! The idea kind of grew into a long bolster, since I wanted all 3 scriptures on one pillow. I'm glad my daughter liked it in the end. Sometimes you never know if you're going to like the end product.
DeleteFreezer paper is great isn't it? I'm hosting a bloglovin' blog hop over at www.thenymelrosefamily.blogspot.com/2012/02/bloglvin-blog-hop.html from now until Sunday and I would love it if you would come link up.
ReplyDeleteI am a new fan of freezer paper! Thanks so much for the invite!!...I'll hop on over! Appreciate you stopping by, Jenny!
DeleteWhat a great project. I've bought the supplies to do this but haven't put my printer to the test because I just didn't think it could handle it! Recently it wouldn't even print a thick cardstock! But you've made me think I should at least give it a try! Thanks so much for sharing your pillow project. It turned out great!
ReplyDeleteI'll keep my fingers crossed...hope your printer hangs in there! I was totally amazed!! Thanks Sonya for taking a look!
DeleteTotally love this- and am going to have to try it!! Love how your pillow came out- thanks for linking up at Feathered Nest Friday!
ReplyDeleteCourtney...thank you so much! I'm a little hooked on the entire printing on burlap process. And thank you for hosting the link party! I appreciate your comment very much!
DeleteOh, how sweet! What an amazing idea! Who knew? I don't have a special printer for things like that so I'll try this method! Thanks so much for linking up at my place!
ReplyDeleteMelody
ChattyChics.com
Melody, I was a little amazed at how easy this entire project was. I would love to see what you create!! Thanks so much for hosting the link party!! It's so fun to find new bloggers!
DeleteThanks for linking up!
ReplyDeleteThanks Jenny, for hosting!!!
DeleteLove it, love it!! I'm a new GFC and linky follower. I am posting a link to your post on Cedar Hill Ranch's FB page.
ReplyDeleteThanks again, Anita!! I love your FB page...the rabbit on your profile pic is precious! I have a thing for bunnies....
DeleteWow, that looks fabulous - who knew it could be so doable. Nice job, I bet she was thrilled.
ReplyDeleteIt's fun to surprise a teenager...doesn't happen often! Thanks so much for your comment!
DeleteThat looks great. I am sure your daughter was thrilled. I don't know if I would have been brave enough to try to put burlap in the printer.
ReplyDeleteI did catch her by surprise when she saw the verses...nice mommy moment! It was quite the scene at my house when I clicked "Print"...lolol My hubby and son were on printer watch! We were all surprised it worked so flawlessly, and multiple times. Thanks so much for stopping by!
DeleteI have been meaning to try this, I just haven't had a project that wouldn't require washing yet. Pillows are a great idea!
ReplyDeleteFound your blog at the Linky hop, following you now! Come by Happy Hour Projects and say hello - I've got a link party that starts at 5:00 EST that this would make a great addition to. ;)
Adrianne
www.happyhourprojects.com
Thank you Adrianne for the invite and for hosting! I'm so glad you found me!! Love your collage...I've gotta learn how to do that! (and then some) Great collection of finds!!
DeleteLove me some Pinterest! I am your newest Linky follower via the blog hop and would love for you to follow me back :)
ReplyDeleteThank you Debbie!! I'm a Pinterest addict!!! guess I said that already...lol
DeletePrinting on burlap is on my to-try list. (Right under "printing on burlap" is "printing on tissue paper." You should give it a try!) I love how this pillow turned out! So pretty and so personal! I hope she loves it!
ReplyDeleteFound you on Happy Hour Projects
Visiting from Well Rounded, leahkoenig.blogspot.com
I saw a post about printing on tissue...I think I pinned it on my craft board on Pinterest. I'm a little nervous about that one too, but it's on my list too!
DeleteI'm a huge fan of burlap ... especially when mixed with fine silver and other dainties. Thinking of covering my dining room chairs with burlap. Would love to try this print method on them. Any thoughts on what I could print on them? By the way, now following you via Linky!
ReplyDeleteI love the look of burlap with something more formal...neat contrast! This method only works with an 8 1/2" X 11" copy paper size piece of burlap. You could stitch it on the chair covering/slipcover. You might look into finding a stencil design you like that fits the size you need for your chairs. That's a cool look too! Royal design has a lot online. Check out Ballard Designs for design ideas...like maybe acanthus leaves or fleur de lis...? I know there are ways to make your own stencil as well, I just don't have one of those machines. Thanks for following!!
DeleteJust got the new Ballard catalog. I know what I'll be doing tonight! :)
Deletelove this idea (!!) and would like to try it but not sure if the burlap would
ReplyDeletemess up the head on my printer...and was wondering what the manufacture and the model of your printer is?
I've tried this on 2 inkjet printers. The first was a Canon and the one I have currently is an HP and they both worked perfectly! I was a bit surprised myself, because my first printer was a bit finicky. Hope it turns out well for you!
DeleteHi to everybody, here everyone is sharing such knowledge, so it’s fastidious to see this site, and I used to visit this blog daily.
ReplyDeleteWonderful ideas guys for printing I will really appreciate you for posting such great info.
ReplyDeletePhotocopierQuoter
It’s really very informative that I wanted ever, thanks for this.bubblegum casting
ReplyDelete