Pages

Friday, June 29, 2012

Giveaway from Royal Design Studio Stencils


*This Giveaway is now closed*
You know how much I LOVE beautiful things!
And you know I'm a huge fan of
 Royal Design Studio  and their
amazing stencils....
 like this allover wall damask stencil...
 or this simply stenciled headboard...
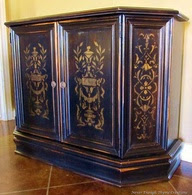
 I love the impressive stenciling on this furniture piece...
or these stenciled drapes...
Check out my Embossing Furniture DIY tutorial here.
Or my How to Stencil a Roller Shade tutorial here.


Have I tempted you yet???
Are you ready to stencil something?  The ideas are endless...and you don't have to stencil a wall!  
Well.....Royal Design Studio has offered to give a stencil up to $50 in value to one of my followers!!!

Yeah YOU!!!

All you have to do is comment here on this post to enter and a Winner will be chosen on Monday, July 9, 2012.

First, follow me somehow, someway...
see those little buttons on the right with the f, t, P...just click 'em
 (Facebook, Twitter, Pinterest...also GFC, G+,  and/or email)

     Check out the Royal Design Studio webpage here, and come back and comment to tell me which stencil you'd like (it's ok, you can change your mind before you win).

Want more entries???  Oh yeah, ya do!

    Head on over to RDS's Facebook page and "like" it...then leave another comment letting me know you did!  They post really cool ways to use their stencils there!  You'll love it!

    If you love Pinterest like I do, you can follow RDS's Pinterest boards here....then leave another comment letting me know!  I love gathering ideas on Pinterest boards, so you'll see lots of cool pics being shared there!

     Do you Tweet?, then follow RDS's Twitter here,...then leave another comment letting me know you did! Want to keep up with the latest, other ideas and giveaways?...then Twitter's the place!

     If you click that little "F" button at the bottom of this post, right before comments...and share this post on your Facebook page, you can leave me another comment to let me know! Feel free to tweet it and +1 it too!

Wowzie!  
So that's 5 entries for ya!
 and you must write a comment for each entry, please!

Have fun and Happy Fourth of July...
WINNER announced on MONDAY, JULY 9, 2012

Monday, June 25, 2012

How to Stencil a Roller Shade


Paint a roller shade?  The kind that are made of vinyl??
 Yes, you heard right!  
I did some research before I got started, to make sure this was going to work.  I think it turned out great!  Each shade (light filtering) was only about $8,  and you can trim them to size...now that's awesome!!

I've stenciled before...but not always with paint.  You can find that tutorial here.  I'm a huge fan of Royal Design Studio stencils, because they have good quality stencils as well as incredibly beautiful designs.

 I also got to see their lovely stencil creme colors in person,
as they were sponsors at the Haven Conference.  The colors are to die for!
Stenciling ain't what it used to be...
their stencils look like expensive wallpaper!!!

So, when they offered me a stencil of my choice....
I screamed....really I did!!
I had entered their Pinterest contest, and had stencil envy!  You can find my board here for lots of fun stencil ideas.

I'm a huge houndstooth fan, and had been eye-ing that stencil for awhile.  So I went for the all over houndstooth wall design stencil.  It's from their Modern stencil collection, which also has some other super cool designs like zebra, chevron, and chain link etc.

 My 14 year old son's room has been in need of window treatments for...
6 years now, and he liked the houndstooth idea too.
Gollygeewhiz, he deserves an award,
cuz he never complained! and he was so agreeable!!
I had already hung some canvas drape panels, but he had to keep closing them if he didn't want the sun to glare in his eyes every morning.
This is what you need:

REPOSITIONABLE spray mount adhesive (Michael's)
Martha Stewart Satin craft paint in beetle black (Michael's)
Large & medium pouncer sponge brushes
 Royal Design Studio stencil
roller shade (mine is Levolor light filtering @Lowe's)
Matte spray poly sealer

*The MS craft paint is thicker than most, and has great coverage.  The thicker the acrylic paint, the less "bleeding" you will have.  If I was using this stencil on a wall, the creme paint would be ideal.

 I wanted the stencil design centered on the shade, so I marked at the top of the stencil, where the center of the design was with a sharpie dot.

 I rolled out the shade onto a large rectangle table and marked
(on the cardboard roller) the center of the shade.

"Lightly" spritz the back of the stencil with the repositionable spray adhesive, and line up the center dots.  The light filtering vinyl is thin, so I wanted to be careful with the adhesive.

You want your design level, so I made sure my stencil edge was the same distance from the shade edge at the top, middle and bottom.  Press the stencil down, making sure all the crisp edges are secure.

Don't worry if the vinyl puckers a tad (mine did in the center of the "tooth" shape after I adhered the stencil to it, but it painted out fine).

Squirt a little bit of the paint in a small bowl, and dab the sponge pouncer in the paint.  I unloaded that first dab in the center of the design, then pounced my way to the edges.

You want to limit the paint from getting under the stencil edges.
When done with first pattern, carefully hold vinyl while pulling stencil up and away from project.  I layed my stencil (adhesive side down) onto a poster board, while paint was drying.

Once the paint was dry, I went back and dabbed on a little more paint in a few areas where it needed it.  Might not have this issue if you're using a light blocking shade.

 As you can see in the picture, not all my edges were super crisp...I had some seepage...but it isn't that noticeable when the shades are hanging up, so I didn't mess with trying to touch it up.

When the paint is dry, use the guidelines on the stencil to line it up against the painted houndstooth designs.  These laser lines were awesome and made positioning the stencil so easy!  Measure again along the side to keep it level, and you're ready to paint section 2.

After painting sections all the way down, I worked the sections on the sides until all were completed.  I also decided to paint the lower 1" border on the front and back (where the plastic thingy slides in).

When it was completely dry, I sprayed the painted shade with a matte poly sealer.  Mod Podge makes one,
 just whichever one you have on hand.
This will keep the craft paint from sticking.
Shade completed!!  Now if I can just get him to clean up his room, then I could show you the rest.
That would be an awesome Before and After!

Thank you Royal Design Studios for the stencil!!  I love the big and bold houndstooth stencil!!   Do you like it's big and bold awesomeness???

 But wait...check back here in a few days...there might just be a
 *cough giveaway cough*, if you know what I mean!  oh yeah...

Party Linkups:  Home Stories A 2 Z 
Serenity Now 
Tatertots and Jello 
DIY Showoff 
Beneath My Heart  
NY Melrose Family 
The Winthrop Chronicles 
Savvy Southern Style 


Disclaimer:  Royal Design Studios provided me with the stencil of my choice to review, but I was in no way obligated to write a positive review.  This review was totally mine...my words, my opinions, my everything...me, me, me!


Tuesday, June 19, 2012

Anthro {knockoff} necklace DIY


 Would you guess that this necklace was made of {plastic} chandelier
crystals, silver glass beads, and organza ribbon?
I saw this DIY necklace on Pinterest, and had to try it.
The Morning Letters blog shows how she did it. 
 I made a few changes that worked better for me.  
1 pkg. Silver glass beads (Hobby Lobby-only need 1 package)
1 pkg. Silver glass beads (8mm)...(optional, only need 2 beads)
3 pkgs. Chandelier Crystal {plastic} embellishments (Michael's)
1 pkg. 9 mm jump rings
1/4 inch organza ribbon to match
Ceramocoat acrylic paint...I used Sea Foam
I also used clear top coat fingernail polish, stringing wire (.015" for jewelry) and crimping beads.
You'll also need jewelry pliers, crimpers, and wire cutters.
 Begin by painting the crystal pieces with the craft paint.  I put 2 coats on both sides.  The finish at this point will be matte.  When dry, put 1 or 2 coats of clear top coat fingernail polish (this protects and gives a sheen)
Add jump rings to crystals and begin stringing on the wire, putting 3 silver beads between each crystal.  The first strand will have 9 crystals
and the second will have 7 crystals.

Join the two strands together by threading both wires through one 8mm silver bead, or you can use the smaller 6mm.
 I like the look of the larger one.
1.  Thread both wires through a crimping bead and make a loop, then thread wires back down through bead again.  
Double your organza ribbon and cut to appropriate length
 (I cut at 39") for tying on each side.  

2. Thread one ribbon through loop and pull wires to tighten.
 I only wanted the ribbon doubled to where I'd likely tie it in the back, so before crimping, adjust length of ribbon.   

I doubled and knotted the ribbon to about 13", as seen in above pic.

 Crimp the bead and snip off extra wire.

3.  Make a knot  with the doubled organza ribbon so that it covers the crimp bead.

4.  Tighten knot closely to large bead.    Repeat on the other side.
  Put fray check or a similar product on ends of ribbon to prevent fraying.
Here are a few wardrobe options...love it with white!
 The sea foam green is lovely against the coral.... You just might see me sporting this at the Haven Conference!

I'm off to pack!!!....cuz "I'm leaving on a jet plane" tomorrow morning!


Changes I made to the original instructions from TML blog:
I found that the holes in the silver beads were very tiny and threading with the ribbon was not going to work for me, so I used wire.
I opted not to use the white pearl paint over the acrylic paint.

Monday, June 18, 2012

Lamp Makeover with ASCP

You can paint anything with Annie Sloan Chalk Paint, right?
So I have this lamp....from Marshall's....had it for several years.  The mantle in the Living Room has an electric plug (for Christmas lights and lamps)...so I've been wanting to put a lamp up there to try it out. 
I tried this lamp up there.  One of the problems was that the shade blended in with the wall color.  
I've seen peeps use ASCP on fabric and rave about it, and this shade is vinyl, I think...it has that fake leather look.
After 2 coats of Annie Sloan Graphite...the shade looks fabulous!
The paint covered nicely and then I added clear wax and finished with dark wax (not sure I could tell a huge difference...the dark wax might've made the shade a tad darker, but not really that noticeable).
 The rug in the Living Room has some blue grey in it, so I used the Duck Egg and painted the sections that were previously reddish.  I sanded just a tad, then rubbed on clear wax, then dark wax.
 Here's a closeup of the bottom of the lamp.   As you can see, I just globbed the dark wax on and wiped off a little, then buffed to a nice matte sheen.
I love the way the shade pops now against the wall color.
Are you swooning over my metal crowns?....Love those!!